
A complete beginner’s guide to understanding Networking and getting started
You don't want to learn more than what is required and that is what is covered in this blog post.
Search for a command to run...
You don't want to learn more than what is required and that is what is covered in this blog post.
No comments yet. Be the first to comment.
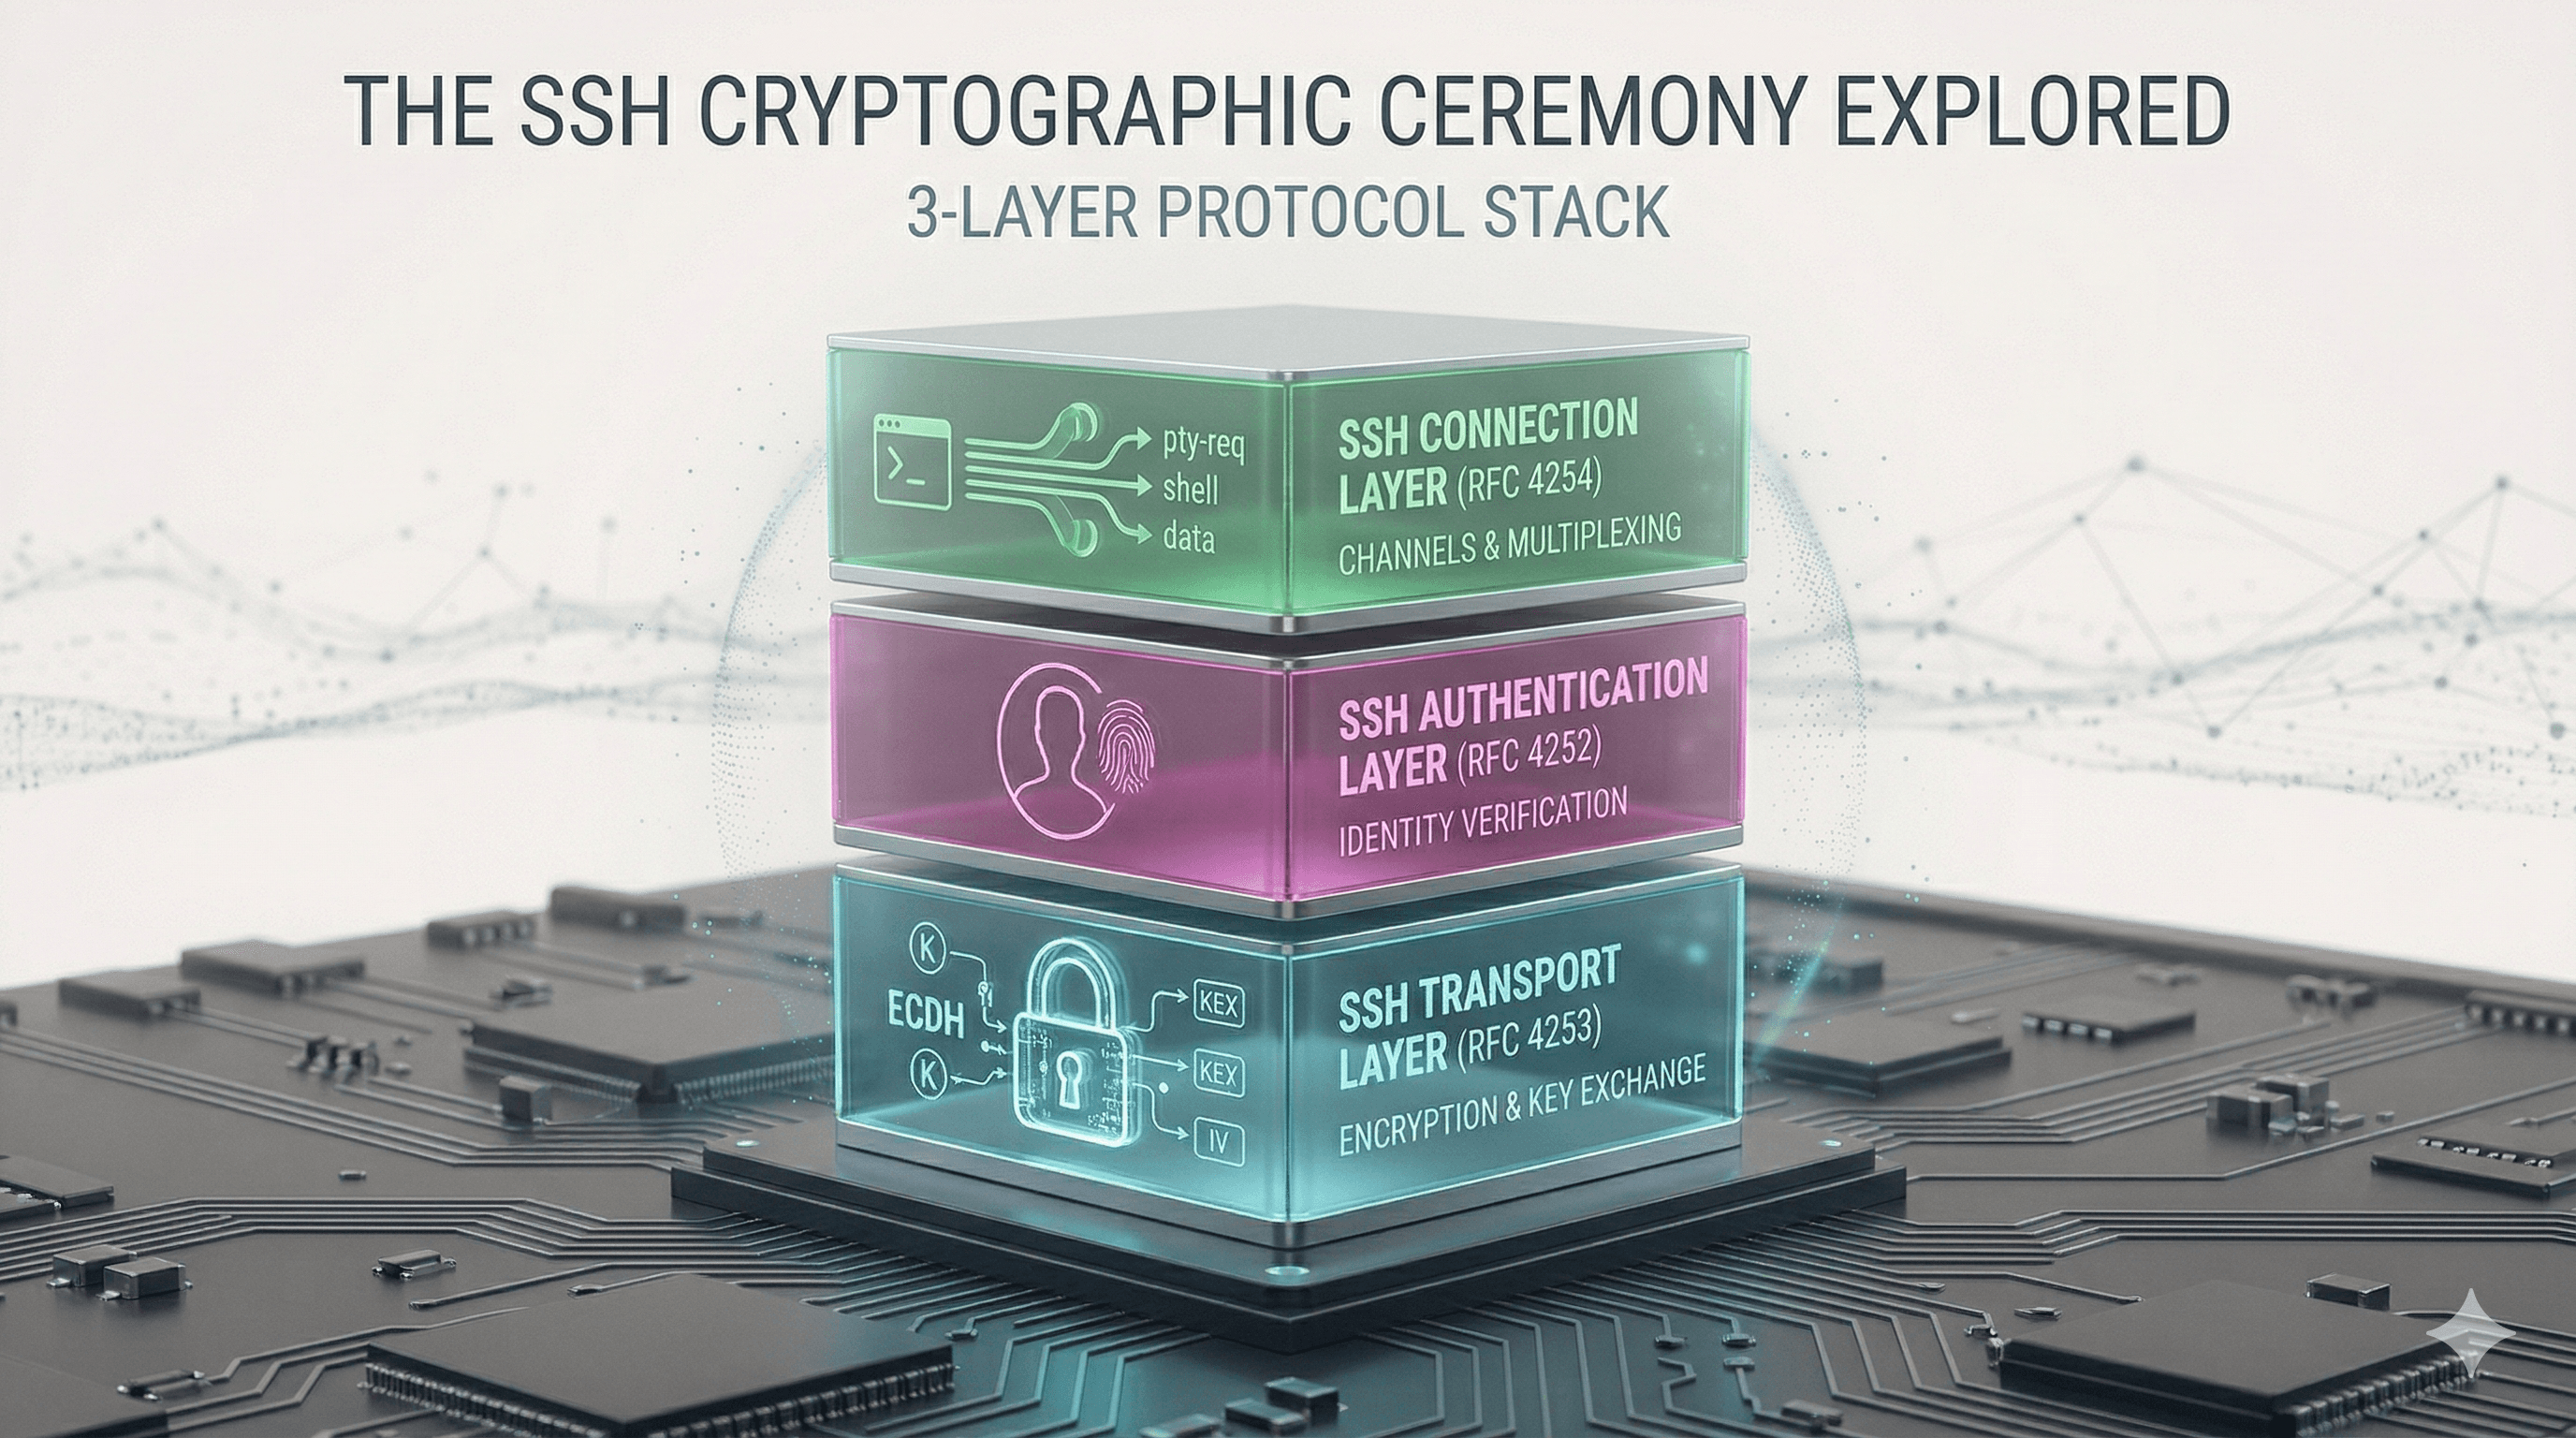
Let's tear apart all the layers of SSH
Kubernetes Over Koffee
2 posts
Reading time: ~55 minutes | Last updated: April 2026
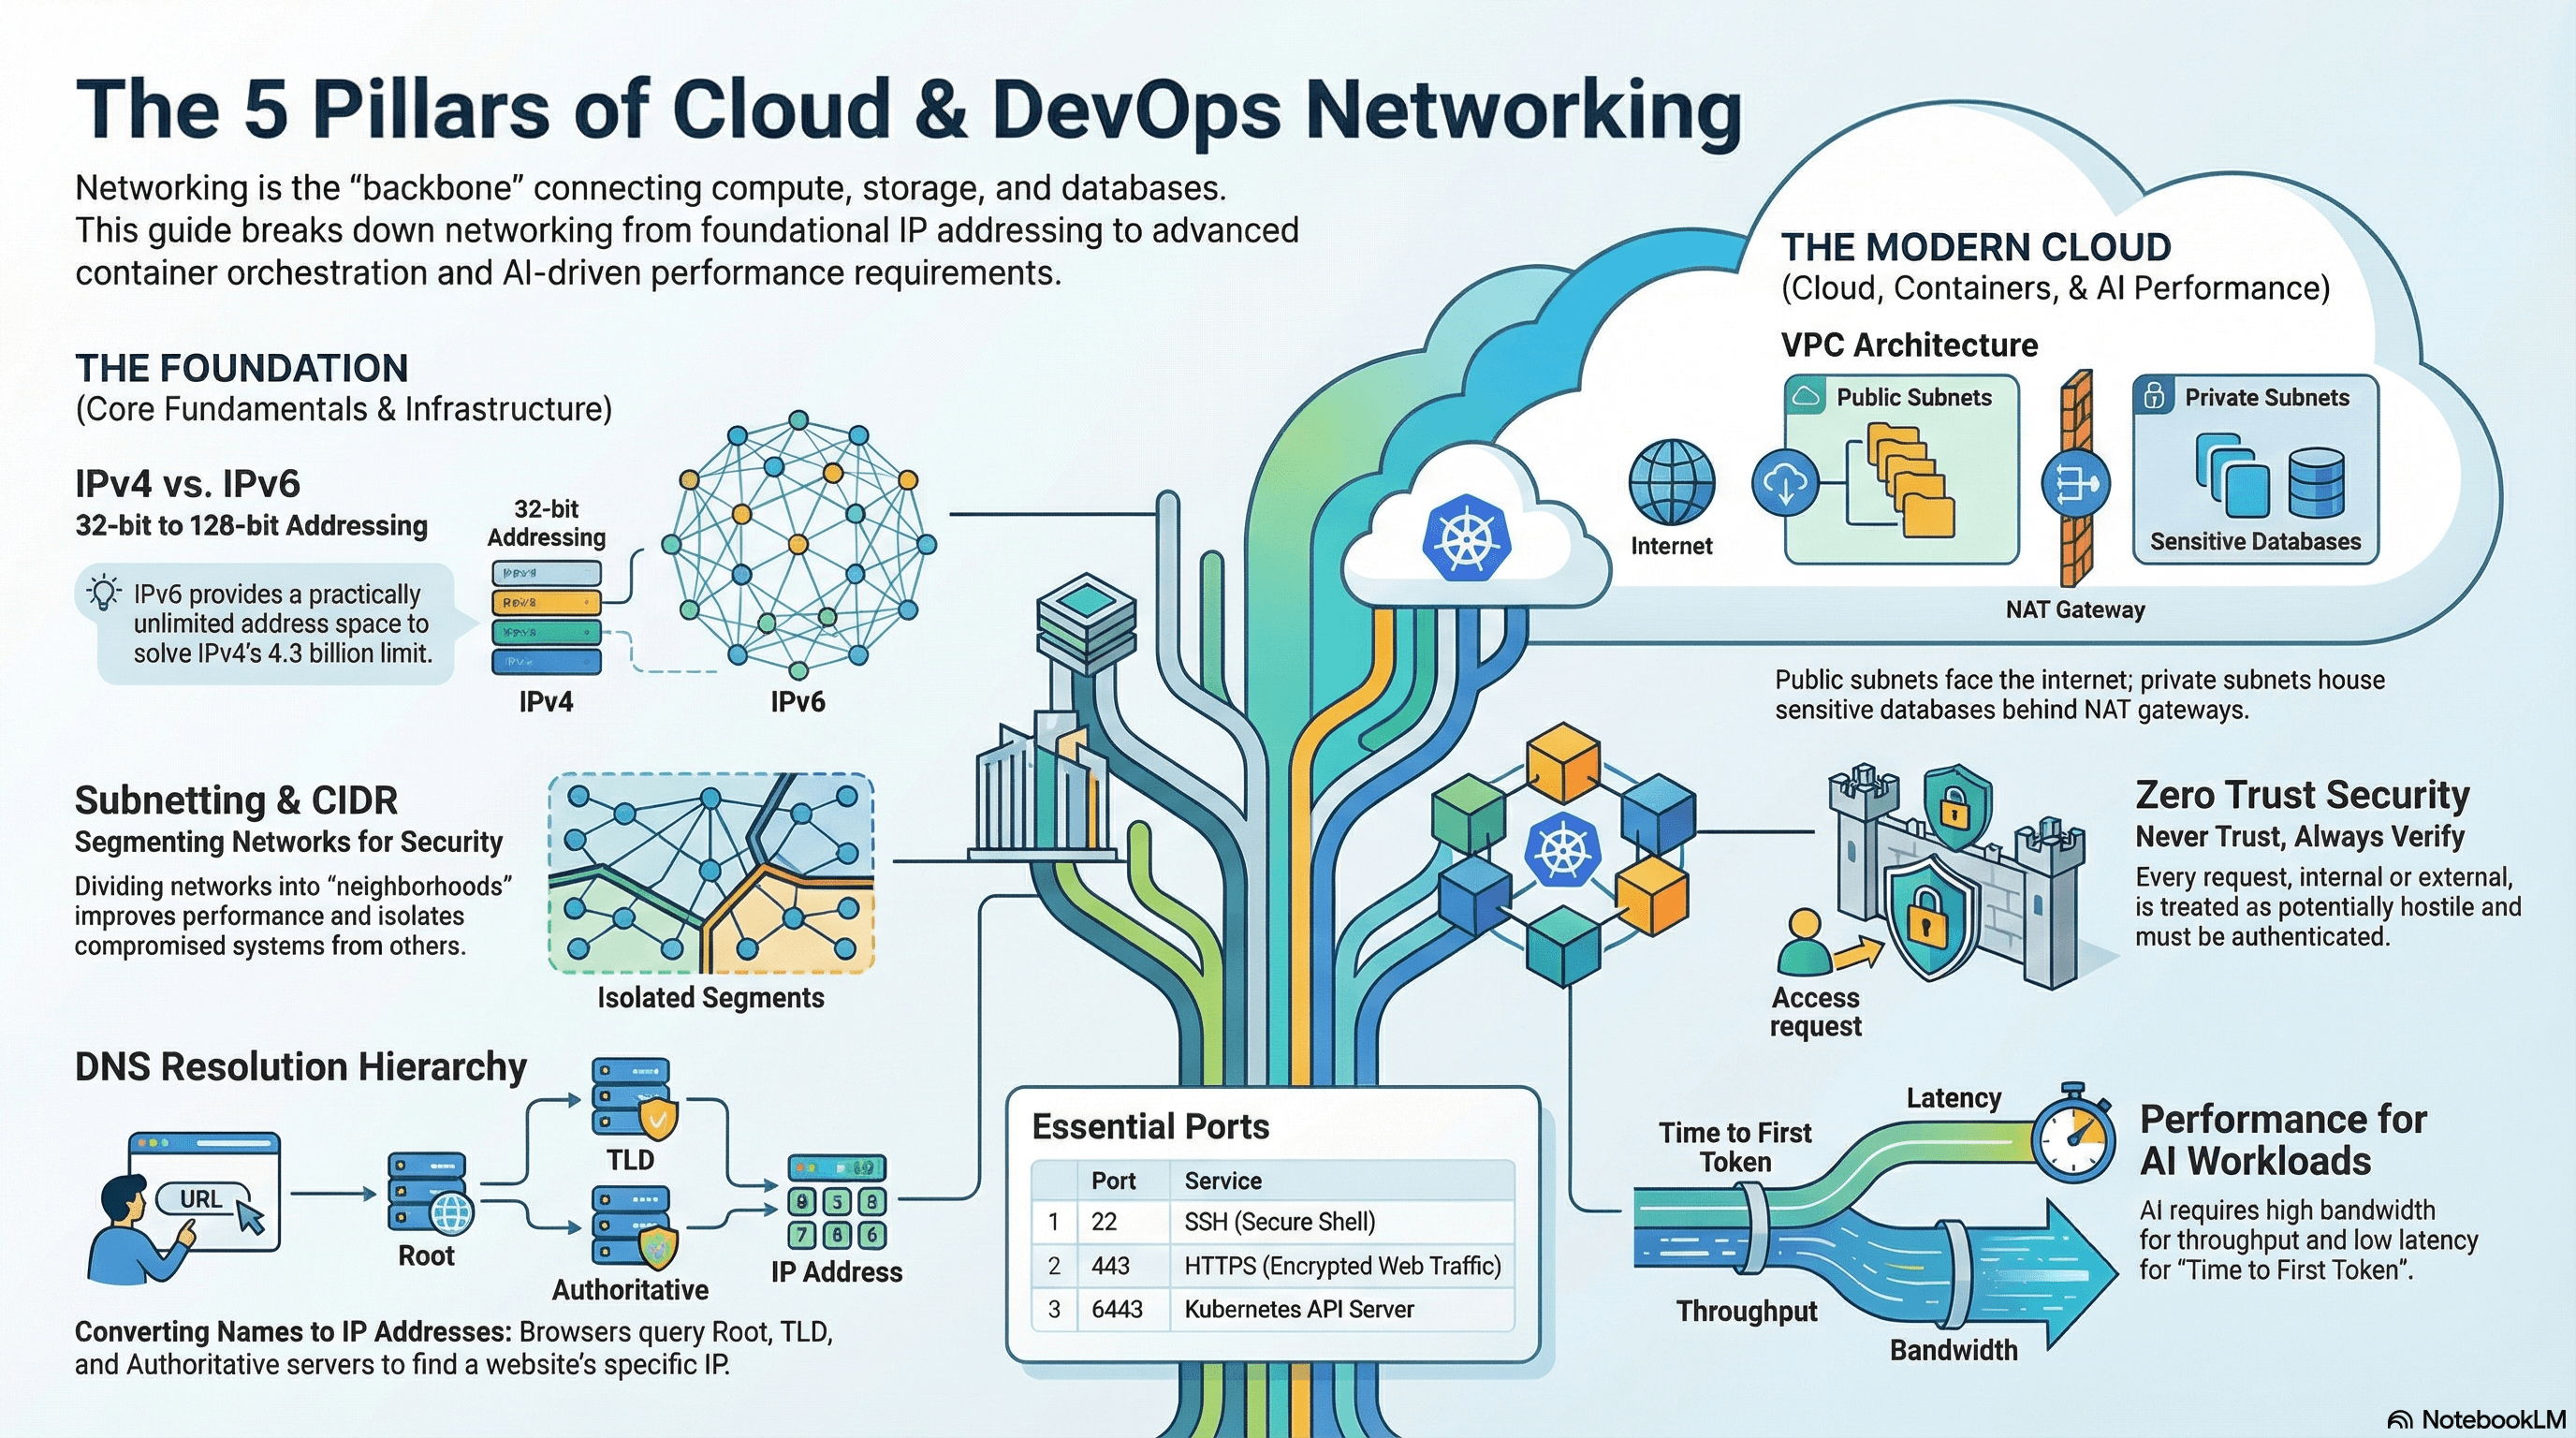
I remember the first time I tried to understand networking. I was staring at terms like TCP/IP, subnets, DNS, and MAC addresses, and honestly, it felt like reading a foreign language. If you're in that spot right now — staring at a wall of jargon and feeling lost — I want you to know something: networking isn't as hard as people make it sound. It's built on ideas you already understand intuitively.
Every time you open a browser, send a message, or stream a video, you're using a network. You just never had to think about how it works. This guide is going to change that.
I'm writing this the way I wish someone had explained networking to me — no unnecessary academic fluff, no skipping over the "obvious" parts that aren't obvious when you're starting out, and plenty of real examples you can try on your own machine.
Let's get into it.
Bandwidth, Latency, and Throughput — The Three Metrics Everyone Confuses
Unicast, Broadcast, and Multicast — Three Ways to Deliver Data
A network is two or more devices connected together so they can share information. That's the whole definition.
Your phone talking to your Wi-Fi router? That's a network. Two laptops connected with an Ethernet cable? Also a network. Billions of devices connected across the globe through undersea cables, satellites, and fiber optics? That's the internet — the biggest network ever built — but at its core, it follows the same basic principles as those two laptops connected by a cable.
Here's an analogy that I think works well. Think of a network like a postal system:
Addresses so the system knows where to deliver things (IP addresses)
Envelopes to package the data (packets)
Post offices and sorting centers that move things along (routers and switches)
Rules about how mail should be formatted (protocols)
Networking is really just a set of agreements and systems that let devices send "digital mail" to each other. Everything else in this guide is just the details of those agreements.
Open a terminal (Command Prompt on Windows, Terminal on Mac/Linux) and type:
ping google.com
You'll see something like:
PING google.com (142.250.190.78): 56 data bytes
64 bytes from 142.250.190.78: icmp_seq=0 ttl=117 time=12.3 ms
64 bytes from 142.250.190.78: icmp_seq=1 ttl=117 time=11.8 ms
What just happened? Your computer sent a tiny packet of data to Google's servers and measured how long it took to get a response. That round-trip time (12.3 ms) means the data traveled from your machine to Google and back in about twelve thousandths of a second. You just used the network — and now you can see it working.
Not all networks are the same size or serve the same purpose. Here's a breakdown of the ones you'll encounter most.
LAN (Local Area Network) — The network inside your home or office. Your laptop, phone, smart TV, and printer all connected to your Wi-Fi router form a LAN. It's small, fast, and under your control. Typical speeds: 100 Mbps to 10 Gbps. Typical range: a single building.
WAN (Wide Area Network) — Connects LANs across large geographical distances. The internet itself is the biggest WAN in existence. When your home LAN connects to your friend's home LAN through the internet, that's WAN territory. Your ISP provides the WAN link from your home to the wider internet.
WLAN (Wireless LAN) — A LAN that uses Wi-Fi instead of cables. Most home networks today are WLANs. They follow the IEEE 802.11 standards (you'll see names like Wi-Fi 5, Wi-Fi 6, Wi-Fi 6E, Wi-Fi 7 — each one faster and more capable than the last).
MAN (Metropolitan Area Network) — City-scale networks. A university campus spread across a city or a municipal Wi-Fi system. You won't deal with this much as a beginner, but knowing the term exists is useful.
VPN (Virtual Private Network) — Creates an encrypted tunnel over the public internet, making it look like you're on a private network even though your traffic traverses the public internet. Think of it as sending your postal mail inside a locked box that only the intended recipient can open.
When someone says "I need to troubleshoot a network issue," the first question should always be: what kind of network are we talking about? A problem on your home LAN (your printer can't connect) is a completely different investigation than a WAN issue (your ISP is having an outage). Understanding the scope of the network narrows down the problem immediately.
Before we talk about what devices do, let's talk about how they're arranged. The physical or logical layout of a network is called its topology.

Star Topology — The most common layout today. Every device connects to a central device (usually a switch or router). If one device fails, the rest keep working. But if the central device dies, everything goes down. Your home network is a star topology — every device connects to your router.
Bus Topology — All devices share a single cable (the "bus"). Data sent by one device is received by all devices, but only the intended recipient processes it. Old-school Ethernet (10BASE2, 10BASE5) used this. It's cheap and simple but terrible for performance and troubleshooting. If the cable breaks anywhere, the whole network goes down.
Ring Topology — Devices form a loop. Data travels in one direction around the ring, passing through each device until it reaches the destination. Token Ring networks used this. The weakness: one broken link can take down the whole ring (though dual-ring designs mitigate this).
Mesh Topology — Every device connects to every other device. Maximum redundancy — if one link fails, data finds another path. The internet's backbone is a mesh (partially — it's called a "partial mesh" because not every router connects to every other router, but there are multiple redundant paths). Full mesh is expensive and complex, so it's mostly used for critical infrastructure.
Hybrid Topology — Most real-world networks mix topologies. Your office might use a star topology within each floor, connected by a bus (backbone cable) running vertically through the building. The internet is a massive hybrid of mesh, star, and everything in between.
Understanding topology helps you predict failure modes. In a star topology, you know the switch is the single point of failure. In a mesh, you know the network can survive link failures. When you're designing or troubleshooting a network, topology is one of the first things to consider.
Here's something the first draft completely skipped: the actual hardware. You need to understand what these devices do before diving into protocols.
A hub is the simplest network device. It receives data on one port and blindly broadcasts it out of every other port. It has no intelligence — it doesn't look at addresses or make decisions. Every device on a hub sees every packet, which creates collisions and wastes bandwidth.
You won't encounter hubs in modern networks. They've been entirely replaced by switches. But knowing what a hub is helps you understand why switches exist.
A switch is the smart version of a hub. It operates at Layer 2 (Data Link) and uses MAC addresses to forward data only to the specific port where the destination device is connected.
Here's the key difference: when your laptop sends data to the printer, a hub blasts that data to every device. A switch knows the printer is on port 5 and sends the data only to port 5. This is vastly more efficient.
Switches maintain a MAC address table (also called a CAM table) that maps MAC addresses to physical ports. They learn this table automatically by observing the source MAC address of frames arriving on each port.
Managed switches add features like VLANs (virtual LANs), port mirroring, QoS (Quality of Service), and spanning tree protocol. These are what you'll find in business networks.
A router operates at Layer 3 (Network) and connects different networks together. While a switch handles traffic within a single network, a router decides how to move data between networks.
Your home router is the border between your private LAN (192.168.1.x) and the public internet. It has at least two interfaces: one facing your LAN and one facing your ISP. When you visit a website, your router forwards your data from your LAN to your ISP's network, and so on until it reaches the destination.
Routers use routing tables to make forwarding decisions. They work with IP addresses, not MAC addresses.
An access point provides Wi-Fi connectivity. It bridges wireless devices into a wired network. Your home "router" is actually three devices in one: a router, a switch (the Ethernet ports on the back), and an access point (the Wi-Fi radio).
In enterprise environments, these are separate devices. An office building might have dozens of access points managed by a central controller, all providing seamless Wi-Fi as you walk around.
A modem (modulator-demodulator) converts signals between your ISP's network and your home network. If your ISP uses cable, your cable modem converts cable signals to Ethernet. If it's fiber, the ONT (Optical Network Terminal) does the same for light signals.
Many ISPs provide a combo device (modem + router + AP in one box). Networking enthusiasts often prefer separate devices for more control.
Internet → ISP → Modem → Router → Switch → Your Devices
                           ↓
                     Access Point → Wireless Devices
Understanding this chain is critical for troubleshooting. If only your wireless devices have issues, the problem is likely at the AP level. If nothing has internet, it might be the modem or ISP.
These three terms are among the most confused in networking. Let's clear this up once and for all.
Bandwidth is the maximum capacity of a connection — how much data could theoretically flow through it per second. It's like the diameter of a water pipe. A 100 Mbps Ethernet connection has a bandwidth of 100 megabits per second. This is the theoretical ceiling, not what you actually get.
Latency is the time it takes for a single piece of data to travel from source to destination. It's measured in milliseconds (ms). When you ping a server and see time=12.3 ms, that's the round-trip latency. Latency is affected by physical distance, the number of hops (routers) in the path, and processing time at each hop.
Throughput is the actual amount of data successfully transferred per second in practice. It's always less than bandwidth because of protocol overhead, congestion, packet loss, and other real-world factors. If your connection has 100 Mbps bandwidth, your actual throughput might be 85 Mbps.
Think of a highway:
Bandwidth = the number of lanes (capacity)
Latency = the speed limit + how long the highway is (travel time)
Throughput = the actual number of cars getting through per hour (accounting for traffic, accidents, toll booths)
A 6-lane highway (high bandwidth) doesn't help if there's a traffic jam (congestion/packet loss). And a 2-lane highway with no traffic (low bandwidth, low latency) might give you better throughput than a congested 6-lane one.
Online gaming cares most about latency — you need fast response times. Streaming video cares most about throughput — you need sustained data flow. A video conference call cares about both — low latency for real-time interaction, and enough throughput for the video stream.
When someone says "my internet is slow," they could mean high latency (things take time to load), low throughput (downloads are slow), or packet loss (things are glitchy and dropping). The fix is different for each.
# Measure latency (round-trip time)
ping -c 10 google.com

# Measure throughput (download/upload speed)
# Install speedtest-cli
speedtest-cli

# Or use curl to measure download speed
curl -o /dev/null -w "Speed: %{speed_download} bytes/sec\n" https://speed.cloudflare.com/__down?bytes=10000000

# Measure path latency at each hop
mtr google.com          # Combines ping + traceroute (install if needed)
The mtr command is one of the most underrated networking tools. It continuously pings every hop along the route, showing you packet loss and latency at each point. If you install one new tool after reading this guide, make it mtr.
The OSI model breaks networking into 7 layers. Each layer has a specific job, and each layer only talks to the layers directly above and below it. Think of it like an assembly line — each station does one thing and passes the work along.
I know this sounds academic. Stay with me — once this clicks, troubleshooting becomes systematic instead of guesswork.
The actual physical stuff — copper wires, fiber optic cables, radio waves (Wi-Fi), the electrical signals running through them. This layer defines voltages, pin layouts, cable specifications, and how bits are represented as physical signals.
Devices: Cables, hubs, repeaters, network interface cards What can go wrong: Unplugged cable, damaged cable, interference on Wi-Fi, faulty network port
Real example: If your internet isn't working and you notice the Ethernet cable is unplugged — that's a Layer 1 problem. If your Wi-Fi is dropping because your microwave is interfering with the 2.4 GHz band — also Layer 1.
Handles communication between devices on the same local network. It uses MAC addresses to identify devices and organizes data into frames. This layer also handles error detection (using CRC checksums on frames) and flow control on the local segment.
Devices: Switches, bridges Protocols: Ethernet (802.3), Wi-Fi (802.11), ARP What can go wrong: MAC address conflicts, switch port misconfiguration, spanning tree loops
Real example: When your laptop sends data to your printer on the same network, Layer 2 uses the printer's MAC address to deliver the frame through the switch to the correct port.
The routing layer. Uses IP addresses to figure out how to get data from one network to another. This is the layer that makes the internet possible — it's what lets your data travel from your home to a server on another continent.
Devices: Routers, Layer 3 switches Protocols: IP (IPv4, IPv6), ICMP, OSPF, BGP What can go wrong: Wrong IP address, incorrect subnet mask, routing table errors, gateway misconfiguration
Real example: When you type google.com, your data needs to cross multiple networks. Layer 3 routers at each hop examine the destination IP and decide where to forward the packet next.
Ensures reliable (or fast) delivery of data end-to-end. It breaks data into segments, manages flow control, handles error recovery, and multiplexes multiple applications over a single IP connection using port numbers.
Protocols: TCP (reliable), UDP (fast) What can go wrong: Port blocked by firewall, connection timeouts, congestion
Real example: When you download a file, TCP (at Layer 4) makes sure every piece arrives correctly and in order. If a segment is lost, TCP detects this and requests retransmission.
Manages sessions — ongoing connections between two devices. Handles opening, maintaining, and closing conversations. Also manages checkpointing and recovery (if a large file transfer fails halfway, the session layer can resume from the checkpoint rather than starting over).
Real example: When you log into a website and stay logged in across multiple page loads, a session is being maintained.
Handles data translation, encryption, and compression. Makes sure data is in a format the receiving application can understand. Think of it as a translator between different data formats.
Examples: SSL/TLS encryption, JPEG compression, character encoding (ASCII to Unicode conversion)
Real example: When your browser receives gzip-compressed data from a web server, this layer handles the decompression.
The layer closest to the user. Where applications and application-layer protocols operate.
Protocols: HTTP, HTTPS, FTP, SMTP, DNS, SSH, SNMP What can go wrong: Application bugs, misconfigured services, authentication failures
Real example: When you open your browser and visit a website, the HTTP protocol at Layer 7 formats your request and interprets the server's response.
Bottom (1) to top (7): Please Do Not Throw Sausage Pizza Away
It gives you a troubleshooting system. Start from the bottom:
Is the cable plugged in? Is Wi-Fi connected? (Layer 1)
Can I see other devices on my local network? (Layer 2)
Can I ping an IP address on another network? (Layer 3)
Can I connect to a specific port on that IP? (Layer 4)
Is the application responding correctly? (Layer 7)
This layered approach saves you from randomly guessing what's wrong. You isolate the problem layer, and that tells you where to focus.
Here's a practical truth: nobody implements the OSI model exactly as described. It's a theoretical framework. What the internet actually runs on is the TCP/IP model, which consolidates those 7 layers into 4 practical ones.

| TCP/IP Layer | OSI Equivalent | Key Protocols | What It Does |
|---|---|---|---|
| Network Access (Link) | Layers 1 & 2 | Ethernet, Wi-Fi, ARP | Physical transmission + local addressing |
| Internet | Layer 3 | IP, ICMP | IP addressing and routing between networks |
| Transport | Layer 4 | TCP, UDP | End-to-end communication, reliability, ports |
| Application | Layers 5, 6, & 7 | HTTP, DNS, SSH, TLS | Everything the application needs |
The TCP/IP model is what you'll reference in real-world work. But the OSI model is still incredibly useful as a thinking tool, especially for troubleshooting. That's why everyone still teaches both.
In conversation, people mix the two freely. Someone might say "that's a Layer 2 issue" (OSI language) while working with the TCP/IP stack. Don't let that confuse you — just understand that both models describe the same reality at different levels of detail.
This is one of the most important concepts in networking, and visualizing it makes everything else easier to understand.
When your application sends data, it doesn't just shoot raw information across the wire. Each layer of the stack wraps the data with its own header, adding the information that layer needs. This wrapping process is called encapsulation.

Here's what happens when you send a message:
Step 1 — Application Layer: Your application creates the data. Let's say it's an HTTP request: GET /index.html. At this point, it's just called data.
Step 2 — Transport Layer: TCP wraps the data with a TCP header (containing source port, destination port, sequence number, flags). The data is now called a segment.
Step 3 — Network Layer: IP wraps the segment with an IP header (containing source IP, destination IP, TTL, protocol type). It's now called a packet.
Step 4 — Data Link Layer: Ethernet wraps the packet with an Ethernet header (containing source MAC, destination MAC) and adds a trailer (CRC checksum for error detection). It's now called a frame.
Step 5 — Physical Layer: The frame is converted into bits — electrical signals on copper, light pulses on fiber, or radio waves over Wi-Fi.
At the receiving end, the whole process reverses. Each layer strips its header, reads the relevant information, and passes the payload up to the next layer. This is de-encapsulation.
When you look at a packet in Wireshark, you're literally seeing these layers. The Ethernet header is there. The IP header is inside it. The TCP header is inside that. And the HTTP data is inside that. Understanding encapsulation is what makes packet analysis readable instead of gibberish.
Also, the terminology matters in conversation. If someone says "frame," they're talking about Layer 2 data. "Packet" means Layer 3. "Segment" means Layer 4. Using the right terms makes you sound like you know what you're doing — because you will.
If the network is a postal system, the IP address is the street address. Every device on a network needs one.
An IPv4 address looks like this: 192.168.1.10
It's four numbers (called octets) separated by dots. Each octet ranges from 0 to 255. Under the hood, each octet is 8 bits, so an IPv4 address is 32 bits total.
Let's see that in binary, because understanding the binary representation is essential for subnetting later:
  192    .   168    .    1     .    10
11000000 . 10101000 . 00000001 . 00001010
32 bits gives us 2^32 = roughly 4.3 billion possible addresses. That sounded like plenty in the 1980s. With billions of devices on the internet today, we've essentially run out. That's why IPv6 exists and why NAT is so important.
This trips up beginners constantly, so let me be crystal clear.
Public IP addresses are globally unique. Your ISP assigns one to your home router. This is the address the rest of the internet sees.
Private IP addresses are only unique within your local network. They are not routable on the public internet. Three ranges are reserved for private use (defined in RFC 1918):
| Range | CIDR | Typically Used For |
|---|---|---|
| 10.0.0.0 – 10.255.255.255 | 10.0.0.0/8 | Large corporate/cloud networks |
| 172.16.0.0 – 172.31.255.255 | 172.16.0.0/12 | Medium enterprise networks |
| 192.168.0.0 – 192.168.255.255 | 192.168.0.0/16 | Home and small office networks |
When your laptop has IP 192.168.1.10, that address means nothing on the public internet. It only has meaning within your LAN. Your router uses NAT to translate between your private address and the public internet (covered in section 18).
Linux:
# Private IP
ip addr show | grep "inet "

# Public IP
curl -s ifconfig.me
Mac:
# Private IP
ifconfig | grep "inet "

# Public IP
curl -s ifconfig.me
Windows:
REM Private IP
ipconfig

REM Public IP — open browser and visit:
REM https://whatismyipaddress.com
You'll notice your private IP is something like 192.168.x.x, while your public IP is completely different.
IPv6 was created to solve address exhaustion. An IPv6 address is 128 bits long:
2001:0db8:85a3:0000:0000:8a2e:0370:7334
That gives roughly 340 undecillion addresses (3.4 × 10^38). Enough for every grain of sand on Earth to have its own IP address trillions of times over.
IPv6 can be shortened by dropping leading zeros and replacing consecutive groups of all-zeros with :::
2001:0db8:85a3:0000:0000:8a2e:0370:7334
becomes:
2001:db8:85a3::8a2e:370:7334
IPv6 adoption has been growing steadily (Google reports over 45% of its traffic is now IPv6), but IPv4 still dominates in practice. As a beginner, master IPv4 first. The jump to IPv6 is mostly about the longer address format and some protocol differences (IPv6 has no broadcast — it uses multicast instead, and no NAT by design since there are enough addresses for everyone).
| Address | Meaning |
|---|---|
127.0.0.1 |
Loopback — always refers to your own machine. ping 127.0.0.1 pings yourself. |
0.0.0.0 |
"All interfaces" or "any address." Common in server configurations. |
255.255.255.255 |
Broadcast address — reaches every device on the local network. |
169.254.x.x |
Link-local / APIPA — your device assigned itself this because DHCP failed. This usually means a connectivity problem. |
::1 |
IPv6 loopback (equivalent of 127.0.0.1). |
This is the topic that makes most beginners want to quit networking. I'm going to teach it differently — starting with the binary math that makes it intuitive, rather than asking you to memorize tables.
A subnet is a logical division of an IP network. If an IP address is a street address, the subnet is the neighborhood. Subnetting lets you carve a large network into smaller, manageable pieces. It also controls which devices can communicate directly (same subnet) versus which need a router (different subnets).
Every IP address comes paired with a subnet mask. The mask tells you which bits of the IP identify the network and which identify the host (specific device).
IP Address:     192.168.1.10
Subnet Mask:    255.255.255.0
In binary:
IP:     11000000.10101000.00000001.00001010
Mask:   11111111.11111111.11111111.00000000
        |--- Network (24 bits) ---|-- Host -|
The rule is simple: Where the mask has a 1, that bit belongs to the network portion. Where it has a 0, that bit belongs to the host portion.
To find the network address, you AND the IP and mask together (bit by bit):
IP:     11000000.10101000.00000001.00001010  (192.168.1.10)
Mask:   11111111.11111111.11111111.00000000  (255.255.255.0)
AND:    11000000.10101000.00000001.00000000  (192.168.1.0) ← Network address
Any device whose IP ANDs to the same network address is on the same subnet.
Instead of writing the full mask, we use a slash and the count of network bits:
192.168.1.10/24
The /24 means the first 24 bits are the network portion — equivalent to 255.255.255.0.
The number of host bits determines how many devices the subnet can hold:
Usable hosts = 2^(host bits) - 2
We subtract 2 because one address is reserved for the network address (all host bits = 0) and one for the broadcast address (all host bits = 1).
| CIDR | Mask | Host Bits | Usable Hosts |
|---|---|---|---|
| /24 | 255.255.255.0 | 8 | 254 |
| /25 | 255.255.255.128 | 7 | 126 |
| /26 | 255.255.255.192 | 6 | 62 |
| /27 | 255.255.255.224 | 5 | 30 |
| /28 | 255.255.255.240 | 4 | 14 |
| /29 | 255.255.255.248 | 3 | 6 |
| /30 | 255.255.255.252 | 2 | 2 |
The scenario: You have the network 10.0.1.0/24 and need to create subnets for:
Engineering: 50 devices
Marketing: 20 devices
Management: 10 devices
Step 1 — Engineer's subnet (50 devices):
You need at least 50 hosts. Find the smallest subnet that fits:
/26 = 62 hosts ✓ (6 host bits: 2^6 - 2 = 62)
/27 = 30 hosts ✗ (too small)
Assign: 10.0.1.0/26
Network: 10.0.1.0
First host: 10.0.1.1
Last host: 10.0.1.62
Broadcast: 10.0.1.63
Step 2 — Marketing's subnet (20 devices):
Next available block starts at 10.0.1.64.
Assign: 10.0.1.64/27
Network: 10.0.1.64
First host: 10.0.1.65
Last host: 10.0.1.94
Broadcast: 10.0.1.95
Step 3 — Management's subnet (10 devices):
Next block starts at 10.0.1.96.
Assign: 10.0.1.96/28
Network: 10.0.1.96
First host: 10.0.1.97
Last host: 10.0.1.110
Broadcast: 10.0.1.111
Now each team has its own subnet, traffic between them requires routing (which lets you apply access controls), and you're not wasting addresses.
# Check your current subnet on Linux
ip addr show
# Look for something like: inet 192.168.1.10/24

# Use ipcalc for quick subnet calculations (install if needed)
ipcalc 10.0.1.0/26
# Shows network, broadcast, host range, etc.
Every network interface card (NIC) — your laptop's Wi-Fi chip, your Ethernet port, your phone's wireless adapter — ships with a MAC (Media Access Control) address assigned at the factory. It's a 48-bit address written as six pairs of hexadecimal digits:
a4:83:e7:2f:10:b5
The first three pairs (a4:83:e7) are the OUI (Organizationally Unique Identifier) — they identify the manufacturer. The last three pairs are a unique serial assigned by that manufacturer. In theory, no two NICs in the world share a MAC address (though in practice, MAC addresses can be spoofed or changed in software).
IP address vs MAC address: Your IP address is like your mailing address — it changes when you move. Your MAC address is like a serial number stamped on your network card — it's tied to the hardware.
MAC addresses only matter at Layer 2 on the local network. When your laptop sends data to your printer on the same subnet, the Ethernet frame uses MAC addresses to deliver it through the switch.
Here's the critical part: MAC addresses don't survive routing. When a frame leaves your network and hits a router, the router strips the Layer 2 header (your MAC and the router's MAC) and creates a new one for the next hop. The IP addresses stay the same end-to-end, but MAC addresses change at every router hop.
Here's the problem: your application knows the destination IP (192.168.1.20 — the printer), but Layer 2 needs a MAC address to deliver the frame. How does your machine find the MAC address for that IP?
ARP (Address Resolution Protocol) solves this.
Your machine broadcasts an ARP Request to every device on the local network: "Who has IP 192.168.1.20? Tell 192.168.1.10 (me)."
Every device receives this broadcast, but only the device with IP 192.168.1.20 responds.
That device sends an ARP Reply directly back: "I have 192.168.1.20, and my MAC is a4:83:e7:2f:10:b5."
Your machine stores this mapping in its ARP cache so it doesn't have to ask again for a while.
# View your ARP cache (all platforms)
arp -a

# Linux — more detailed view
ip neigh show

# Watch ARP in real-time with tcpdump
sudo tcpdump -i any arp

# Then ping a device you haven't communicated with recently
# and watch the ARP request/reply in the tcpdump output
ARP has no authentication. Any device can claim to be any IP address. An attacker on your local network can send fake ARP replies, associating their MAC address with your gateway's IP. This redirects your traffic through the attacker's machine — a classic man-in-the-middle attack. This is one reason why HTTPS (which encrypts data end-to-end) is so important, and why you shouldn't trust open Wi-Fi networks.
There are three fundamental ways to deliver data on a network. Understanding these clarifies a lot of other concepts.
Unicast — One-to-one. Data is sent from one source to one specific destination. When you browse a website, your connection to the web server is unicast. Most network traffic is unicast.
Broadcast — One-to-all. Data is sent to every device on the local network. ARP requests are broadcasts. DHCP discovery is a broadcast. Broadcasts don't cross routers — they stay within the local subnet (this boundary is called the broadcast domain).
Multicast — One-to-many (but not all). Data is sent to a group of interested devices. Instead of sending the same video stream 100 times (unicast to each viewer), a streaming service can send it once as multicast, and only devices that subscribed to that multicast group receive it. IPTV and some enterprise video conferencing use multicast.
Every broadcast packet must be processed by every device on the network, even if most devices don't care about it. In a large flat network with thousands of devices, broadcast traffic can consume significant bandwidth and CPU time — this is called a broadcast storm in the worst case. This is one of the key reasons networks are divided into subnets — each subnet is its own broadcast domain, limiting the blast radius of broadcasts.
This is one of my favorite topics because once you understand DNS, you suddenly understand why "the internet is slow" can mean very different things.
Humans remember names. Computers use numbers. DNS (Domain Name System) translates google.com into 142.250.190.78 so you don't have to memorize IP addresses.
Let's trace what happens when you type www.example.com:

Step 1 — Check local caches. Your browser has a cache. Your OS has a cache. If a recent lookup exists, it uses that immediately — no network request needed.
Step 2 — Query the recursive resolver. Cache miss? Your computer asks a recursive resolver (usually provided by your ISP, or a public one like 8.8.8.8 from Google or 1.1.1.1 from Cloudflare). This resolver does all the heavy lifting.
Step 3 — Root name servers. The resolver asks a root name server (there are 13 clusters, operated by different organizations around the world). The root doesn't know the answer, but knows who handles .com domains.
Step 4 — TLD name servers. The .com TLD (Top-Level Domain) server doesn't know example.com's IP either, but knows which authoritative name server handles example.com.
Step 5 — Authoritative name server. This server has the actual DNS records for example.com. It responds: "The A record for www.example.com is 93.184.216.34."
Step 6 — Response delivered. The resolver passes the IP back to your computer, caching it along the way. Your browser can now connect.
This entire hierarchy of queries typically resolves in 20-80 milliseconds. And thanks to caching at every level, most lookups are nearly instant.
DNS stores multiple types of records:
| Record | Purpose | Example |
|---|---|---|
| A | Domain → IPv4 address | example.com → 93.184.216.34 |
| AAAA | Domain → IPv6 address | example.com → 2606:2800:220:1:... |
| CNAME | Alias / canonical name | www.example.com → example.com |
| MX | Mail server for the domain | example.com → mail.example.com (priority 10) |
| NS | Authoritative name servers | example.com → ns1.example.com |
| TXT | Arbitrary text (SPF, DKIM, domain verification) | v=spf1 include:_spf.google.com ~all |
| PTR | Reverse DNS (IP → domain) | 34.216.184.93 → example.com |
| SOA | Start of Authority (zone metadata) | Serial number, refresh intervals |
| SRV | Service location (port + host for a service) | _sip._tcp.example.com → sipserver.example.com:5060 |
# Basic lookup
nslookup example.com

# Detailed lookup with dig
dig example.com

# Query specific record types
dig example.com MX
dig example.com TXT
dig example.com NS

# Trace the full resolution path (fascinating to watch)
dig +trace example.com

# Use a specific DNS server
dig @8.8.8.8 example.com
dig @1.1.1.1 example.com

# Reverse DNS lookup
dig -x 93.184.216.34

# Check which DNS server your system uses (Linux)
cat /etc/resolv.conf

# Check DNS resolution time
time dig example.com
"DNS_PROBE_FINISHED_NXDOMAIN" — The domain doesn't exist (or your DNS can't find it).
# Step 1: Flush DNS cache
sudo systemd-resolve --flush-caches    # Linux (systemd)
sudo dscacheutil -flushcache            # Mac
ipconfig /flushdns                      # Windows

# Step 2: Test with a different DNS server
dig @8.8.8.8 the-failing-domain.com

# Step 3: If it works with 8.8.8.8 but not your default,
#          change your DNS server to 8.8.8.8 or 1.1.1.1
Standard DNS queries travel in plain text. Anyone between you and the resolver can see what domains you're looking up. This is a privacy concern. Modern solutions include:
DNS over HTTPS (DoH) — Encrypts DNS queries inside HTTPS. Firefox and Chrome support this.
DNS over TLS (DoT) — Encrypts DNS queries using TLS. Android supports this natively.
DNSSEC — Doesn't encrypt queries, but signs DNS responses so you can verify they haven't been tampered with. Prevents DNS spoofing attacks.
If an IP address gets data to the right building (the device), a port gets it to the right apartment (the application) inside that building.
A port is a 16-bit number (0–65535) that identifies a specific application or service. When your computer receives data, the port tells the OS which application should handle it.
| Range | Name | Purpose |
|---|---|---|
| 0–1023 | Well-Known Ports | Reserved for standard services (HTTP, SSH, DNS) |
| 1024–49151 | Registered Ports | Used by applications (MySQL, PostgreSQL, Redis) |
| 49152–65535 | Ephemeral (Dynamic) Ports | Temporary ports assigned to client connections |
| Port | Protocol | What It Does |
|---|---|---|
| 20/21 | FTP | File transfer (20=data, 21=control) |
| 22 | SSH | Secure remote access |
| 23 | Telnet | Remote access — unencrypted, never use this |
| 25 | SMTP | Sending email |
| 53 | DNS | Domain name resolution (uses both TCP and UDP) |
| 67/68 | DHCP | Dynamic IP assignment (67=server, 68=client) |
| 80 | HTTP | Unencrypted web traffic |
| 110 | POP3 | Retrieving email |
| 143 | IMAP | Retrieving email (more modern than POP3) |
| 443 | HTTPS | Encrypted web traffic |
| 587 | SMTP (submission) | Email sending (modern, with authentication) |
| 3306 | MySQL | Database |
| 5432 | PostgreSQL | Database |
| 6379 | Redis | In-memory data store |
| 8080 | HTTP Alt | Common alternative for web servers/proxies |
| 8443 | HTTPS Alt | Common alternative for HTTPS |
A socket is the combination of IP + port. A complete network connection is identified by a 5-tuple:
(Protocol, Source IP, Source Port, Destination IP, Destination Port)
Example:
(TCP, 192.168.1.10, 52431, 142.250.190.78, 443)
This uniquely identifies one specific conversation between your browser and Google's server. Your browser can have dozens of simultaneous connections to different servers (or even the same server on different ports), and each one has a unique 5-tuple.
# See all listening ports and which programs are using them
ss -tulnp               # Linux
netstat -tulnp           # Linux (older)
netstat -an | grep LISTEN # Mac
netstat -an              # Windows

# Check if a specific port is open on a remote host
nc -zv google.com 443
nc -zv google.com 80

# See which process is using a specific port
sudo lsof -i :80        # Mac/Linux
Both live at Layer 4 (Transport), but they represent two fundamentally different philosophies of data delivery.
TCP is the "reliable" protocol. It guarantees data arrives correctly, completely, and in order.

The Three-Way Handshake (Connection Setup):
SYN: Client → Server. "I want to connect." (Sends a synchronize packet with a random sequence number.)
SYN-ACK: Server → Client. "Okay, I acknowledge your SYN. Here's my sequence number too."
ACK: Client → Server. "Got it. Connection established."
The Four-Way Teardown (Connection Close):
This is what the first draft completely missed. Closing a TCP connection also follows a formal process:
FIN: Side A says "I'm done sending."
ACK: Side B acknowledges. (Side B might still have data to send.)
FIN: Side B says "I'm done too."
ACK: Side A acknowledges. Connection fully closed.
This four-step close exists because TCP connections are bidirectional — each side independently closes its sending half.
TCP's Reliability Mechanisms:
Sequence numbers: Every byte of data gets a sequence number. The receiver knows exactly what order to reassemble.
Acknowledgments: The receiver confirms what it got. If the sender doesn't get an ACK within a timeout, it retransmits.
Checksums: Each segment includes a checksum to detect corruption.
Flow control (Window Size): The receiver tells the sender how much data it can handle, preventing overwhelming a slow receiver.
Congestion control: TCP detects network congestion (packet loss) and slows down to reduce it (algorithms like slow start, congestion avoidance, fast retransmit).
UDP is the "fast and lean" protocol. No connection setup. No guarantees. It just sends datagrams.
What UDP doesn't do:
No handshake — sends immediately
No acknowledgments — doesn't know if data arrived
No ordering — packets may arrive out of sequence
No congestion control — sends as fast as it can
What UDP offers:
Minimal overhead (8-byte header vs TCP's 20+ bytes)
Lower latency (no handshake delay)
No head-of-line blocking (one lost packet doesn't stall the rest)
Supports broadcast and multicast
| Scenario | Protocol | Why |
|---|---|---|
| Web browsing | TCP | Every byte of HTML/CSS/JS must arrive correctly |
| File download | TCP | A corrupted file is useless |
| TCP | You need the whole message | |
| SSH | TCP | Every keystroke matters |
| Live video streaming | UDP | Skip a dropped frame, don't freeze the whole stream |
| Online gaming | UDP | A stale position update is worse than a skipped one |
| Voice/video calls (VoIP) | UDP | Low latency is more important than perfection |
| DNS queries | UDP (usually) | Small, fast request/response. Falls back to TCP for large responses |
TCP is a phone call. Dial, wait for pickup, talk with confirmation, hang up properly.
UDP is shouting across a field. Fast, no waiting, but maybe they didn't hear you.
ICMP (Internet Control Message Protocol) lives at Layer 3 and serves as the network's error reporting and diagnostic system. You've already used it — every time you run ping, you're sending ICMP messages.
| Type | Name | What It Means |
|---|---|---|
| 0 | Echo Reply | "I'm here!" (ping response) |
| 3 | Destination Unreachable | "I can't reach that." (with subtypes for network, host, port, etc.) |
| 5 | Redirect | "There's a better route — use this gateway instead." |
| 8 | Echo Request | "Are you there?" (the ping itself) |
| 11 | Time Exceeded | "TTL hit zero — packet died." (this is what makes traceroute work) |
traceroute exploits ICMP's Time Exceeded message. It sends packets with increasing TTL (Time To Live) values:
Sends a packet with TTL=1. The first router decrements TTL to 0, drops the packet, and sends back an ICMP Time Exceeded. Now you know the first hop.
Sends a packet with TTL=2. The first router decrements to 1, forwards it. The second router decrements to 0, sends back Time Exceeded. Now you know hop 2.
This continues until the packet reaches the destination.
This is why some hops in traceroute output show * * * — those routers are configured to not send ICMP Time Exceeded messages (for security reasons).
Many firewalls block ICMP. This is why ping sometimes fails even when a server is perfectly reachable via HTTP. A failed ping doesn't always mean the host is down — it might just mean ICMP is blocked.
When you connect your phone to Wi-Fi and it "just works" without manual configuration, DHCP is responsible.
Discover — Your device broadcasts: "Is there a DHCP server? I need an IP address!" (UDP broadcast to 255.255.255.255)
Offer — The DHCP server responds: "Here's 192.168.1.25. Gateway is 192.168.1.1, DNS is 8.8.8.8, lease is 24 hours."
Request — Your device replies: "I'll take 192.168.1.25, please."
Acknowledge — Server confirms: "Done. It's yours for 24 hours."
The lease concept is key. Your device borrows the IP for a set period. Before the lease expires, your device automatically attempts to renew. If you disconnect and the lease expires, the address returns to the pool.
DHCP assigns more than just an IP address:
IP address
Subnet mask
Default gateway
DNS server(s)
Lease duration
Optionally: NTP servers, domain name, TFTP server (for network booting), and more
Dynamic (DHCP): Address can change. Fine for laptops, phones, and most devices.
Static: Manually assigned permanent address. Essential for servers, printers, network devices, and anything other devices need to find reliably.
DHCP Reservation: A hybrid approach — the DHCP server always assigns the same IP to a specific MAC address. The device still uses DHCP, but gets a consistent address. This is often the best approach for home lab servers and printers.
# Release and renew on Linux
sudo dhclient -r eth0        # Release
sudo dhclient eth0            # Renew

# On Windows
ipconfig /release
ipconfig /renew

# Check your lease info (Linux)
cat /var/lib/dhcp/dhclient.leases
Your ISP gives you one public IP address. You have 15+ devices that need internet. How?
NAT (Network Address Translation), running on your router, maintains a translation table that maps each internal device's private IP and port to the router's single public IP with a unique port.

Your laptop visits a website:
Laptop: 192.168.1.10:52431
  → Router NAT → 203.0.113.5:12001
    → Internet → Web Server

Response from Web Server
  → 203.0.113.5:12001
    → Router NAT → 192.168.1.10:52431
      → Laptop
Your phone, simultaneously:
Phone: 192.168.1.11:48922
  → Router NAT → 203.0.113.5:12002
    → Internet

Response → 203.0.113.5:12002
  → Router NAT → 192.168.1.11:48922
    → Phone
The router uses different external port numbers to track which internal device made which request. This is technically PAT (Port Address Translation), though most people just call it NAT.
Benefits:
Conserves IPv4 addresses (billions of devices share millions of public IPs)
Provides a basic layer of security (unsolicited inbound connections are dropped by default since the router doesn't know where to forward them)
Drawbacks:
Breaks end-to-end connectivity (external devices can't initiate connections to your devices)
Complicates hosting services from home (you need port forwarding)
Breaks some protocols that embed IP addresses in their payload
Adds latency (translation takes time)
Makes peer-to-peer connections harder (both sides are behind NAT)
Port forwarding is the workaround for hosting services: you tell the router "any traffic arriving on external port 8080 should be forwarded to internal device 192.168.1.100 port 80." This is how people run home servers, game servers, and security cameras accessible from outside.
When you send data to a server on another continent, it doesn't teleport. It hops through multiple routers, each making a decision about the next step. This decision-making is routing.
Every router has a routing table — a list of known networks and the "next hop" to reach each one. When a packet arrives, the router:

Reads the destination IP address
Checks its routing table for the best matching route
Forwards the packet to the next hop
The next router repeats the process
No single router knows the complete path to the destination. Each router only knows the next step. It's like asking for directions in an unfamiliar city — each person you ask knows their local area and points you to the next landmark.
# See every hop to the destination
traceroute google.com        # Linux/Mac
tracert google.com           # Windows

# Better: use mtr for continuous monitoring
mtr google.com               # Shows packet loss per hop in real-time

# Check your machine's routing table
ip route show                 # Linux
netstat -rn                   # Mac
route print                   # Windows
traceroute output explained:
 1  192.168.1.1      1.2 ms     ← Your home router
 2  10.0.0.1         8.4 ms     ← ISP's first router
 3  72.14.215.85    11.7 ms     ← Backbone router
 4  108.170.252.129 12.0 ms     ← Getting closer
 5  142.250.190.78  12.3 ms     ← Destination (Google)
Static routing: Administrator manually enters routes. Fine for simple, small networks. Doesn't adapt to failures.
Dynamic routing: Routers automatically discover and share route information using protocols:
OSPF (Open Shortest Path First): Used within organizations. Routers build a complete map of the network topology and calculate shortest paths using Dijkstra's algorithm.
BGP (Border Gateway Protocol): The protocol that runs the internet. Manages routing between autonomous systems (AS) — large networks operated by ISPs, cloud providers, and enterprises. When you hear about "internet routing," you're hearing about BGP.
Your device's default gateway (usually your home router, like 192.168.1.1) is the "if I don't know where this goes, send it here" address. For any destination not on your local subnet, your machine sends the packet to the default gateway and trusts the router to figure out the rest.
# Check your default gateway
ip route show default         # Linux
netstat -nr | grep default    # Mac
ipconfig | findstr "Gateway"  # Windows
A firewall controls what traffic is allowed into and out of a network or device by examining packets against a set of rules.
Packet filtering firewall: The simplest type. Examines headers (source/destination IP, port, protocol) and allows or blocks based on rules. Stateless — treats each packet independently.
Stateful firewall: Tracks connection state. If your machine initiates a connection to a web server, the firewall remembers and automatically allows the response. But unsolicited inbound connections get blocked. Most modern firewalls are stateful.
Application-layer firewall / WAF (Web Application Firewall): Inspects Layer 7 content. Can block malicious HTTP requests, prevent SQL injection, and filter based on URL patterns or request bodies. Used to protect web applications.
# iptables — traditional Linux firewall
sudo iptables -L -v -n                             # View current rules

# Allow established connections (most important rule)
sudo iptables -A INPUT -m state --state ESTABLISHED,RELATED -j ACCEPT

# Allow SSH, HTTP, HTTPS
sudo iptables -A INPUT -p tcp --dport 22 -j ACCEPT
sudo iptables -A INPUT -p tcp --dport 80 -j ACCEPT
sudo iptables -A INPUT -p tcp --dport 443 -j ACCEPT

# Allow ICMP (ping)
sudo iptables -A INPUT -p icmp -j ACCEPT

# Allow loopback
sudo iptables -A INPUT -i lo -j ACCEPT

# Block everything else
sudo iptables -A INPUT -j DROP
UFW — the friendly alternative:
sudo ufw enable
sudo ufw default deny incoming
sudo ufw default allow outgoing
sudo ufw allow 22/tcp
sudo ufw allow 80/tcp
sudo ufw allow 443/tcp
sudo ufw status verbose
A proxy server sits between your device and the internet, acting as an intermediary.
Forward proxy: Sits between internal clients and the internet. Your request goes to the proxy, which makes the request on your behalf. Uses: privacy (the destination sees the proxy's IP, not yours), content filtering (corporate networks blocking certain sites), caching (commonly requested content is stored locally).
Reverse proxy: Sits between the internet and your servers. External requests hit the reverse proxy, which forwards them to the appropriate internal server. Uses: load balancing (distributing traffic across multiple servers), SSL termination (handling TLS encryption), caching, security (hiding internal server architecture). Nginx and HAProxy are popular reverse proxies.
Transparent proxy: Intercepts traffic without the client's knowledge. ISPs sometimes use these for caching. Corporate networks use them for content filtering.
HTTP (HyperText Transfer Protocol) is the protocol that powers the web. It's a request-response protocol: your browser sends a request, the server sends a response.
An HTTP request:
GET /index.html HTTP/1.1
Host: www.example.com
User-Agent: Mozilla/5.0
Accept: text/html
Accept-Encoding: gzip, deflate, br
Connection: keep-alive
Key HTTP methods:
| Method | Purpose | Idempotent? |
|---|---|---|
| GET | Retrieve data | Yes |
| POST | Create something new | No |
| PUT | Replace / update entirely | Yes |
| PATCH | Update partially | No |
| DELETE | Remove | Yes |
| HEAD | GET but only headers (no body) | Yes |
| OPTIONS | Ask what methods are supported | Yes |
(Idempotent means calling it multiple times produces the same result as calling it once.)
| Range | Meaning | Key Codes |
|---|---|---|
| 2xx | Success | 200 OK, 201 Created, 204 No Content |
| 3xx | Redirection | 301 Moved Permanently, 302 Found, 304 Not Modified |
| 4xx | Client Error | 400 Bad Request, 401 Unauthorized, 403 Forbidden, 404 Not Found, 429 Too Many Requests |
| 5xx | Server Error | 500 Internal Server Error, 502 Bad Gateway, 503 Service Unavailable, 504 Gateway Timeout |
HTTP/1.1 (1997): One request per TCP connection at a time (or with keep-alive, sequential requests). To load a page with 50 resources, browsers open 6+ parallel TCP connections. Head-of-line blocking is a major problem — one slow response blocks everything behind it on that connection.
HTTP/2 (2015): Multiplexing — multiple requests and responses flow simultaneously over a single TCP connection using binary frames. Header compression (HPACK) reduces overhead. Server push allows the server to send resources before the browser asks for them. Major performance improvement. However, TCP-level head-of-line blocking still exists — if a single TCP packet is lost, all streams on that connection stall until retransmission.
HTTP/3 (2022): The game changer. Replaces TCP with QUIC (built on UDP). QUIC provides its own reliability and encryption (TLS 1.3 is built-in), and eliminates TCP's head-of-line blocking — a lost packet only affects its specific stream, not others. Connection migration means if your phone switches from Wi-Fi to cellular, the connection doesn't break. Most major websites now support HTTP/3.
# See full HTTP conversation
curl -v https://example.com

# See response headers only
curl -I https://example.com

# Check which HTTP version a site uses
curl -sI https://www.google.com | grep -i "http/"

# Make a POST request with JSON
curl -X POST https://httpbin.org/post \
  -H "Content-Type: application/json" \
  -d '{"name": "test", "value": 42}'

# Follow redirects
curl -L -I http://google.com     # Watch the 301 → 200

# Measure timing breakdown
curl -w "\n  DNS: %{time_namelookup}s\n  Connect: %{time_connect}s\n  TLS: %{time_appconnect}s\n  Start Transfer: %{time_starttransfer}s\n  Total: %{time_total}s\n" -o /dev/null -s https://example.com
That last curl command is incredibly powerful for diagnosing performance — it shows exactly where time is spent (DNS resolution, TCP connection, TLS handshake, server processing, total).
TLS (Transport Layer Security) is what puts the "S" in HTTPS. Without it, all web traffic would be plain text readable by anyone on the network path.
TLS 1.3 (finalized in 2018) made major improvements over TLS 1.2:
Faster handshake: TLS 1.2 required 2 round trips before encrypted data could flow. TLS 1.3 needs only 1 round trip (and supports 0-RTT resumption for returning connections).
Stronger security: Removed support for weak ciphers and algorithms. Only uses AEAD (Authenticated Encryption with Associated Data) cipher suites. No more RSA key exchange (only ephemeral Diffie-Hellman, providing forward secrecy by default).
Simpler: Fewer cipher suite options means fewer ways to misconfigure. TLS 1.3 has 5 cipher suites versus TLS 1.2's 37+.
Client Hello: Your browser sends supported cipher suites and a key share (Diffie-Hellman parameters).
Server Hello: The server picks a cipher suite, sends its key share, its certificate (proving identity), and a Finished message — all in one step.
Client Finished: The client verifies the certificate (checking the chain of trust back to a trusted Certificate Authority), computes the shared secret, and sends its Finished message.
Encrypted data flows. Both sides now have a shared secret key. All application data is encrypted.
When a server presents its TLS certificate, your browser verifies it by checking:
Is the certificate for this domain? (Common Name or Subject Alternative Name matches)
Is it within its validity period? (Not expired or not-yet-valid)
Is it signed by a trusted Certificate Authority? (The CA that signed the cert is in your OS/browser's trusted root store)
Is the whole chain valid? (Server cert → Intermediate CA → Root CA, each signing the one below)
Has it been revoked? (Checked via CRL or OCSP)
# View a site's TLS certificate
openssl s_client -connect example.com:443 -brief

# See the full certificate chain
openssl s_client -connect example.com:443 -showcerts

# Check TLS version negotiated
curl -vI https://example.com 2>&1 | grep "SSL connection"

# Test if a server supports specific TLS versions
openssl s_client -connect example.com:443 -tls1_3
This is your go-to reference section. Organized by purpose with coverage across operating systems.
# Basic ping
ping google.com                          # All platforms
ping -c 5 google.com                     # Linux/Mac: send exactly 5
ping -n 5 google.com                     # Windows: send exactly 5

# Ping with timestamp
ping -D google.com                       # Linux: shows Unix timestamp

# Trace the route
traceroute google.com                    # Linux/Mac
tracert google.com                       # Windows

# Best of both: continuous trace + ping
mtr google.com                           # Linux (install: apt install mtr)
mtr --report google.com                  # Generate a report
# Quick lookup
nslookup example.com                     # All platforms

# Detailed lookup
dig example.com                          # Linux/Mac
dig example.com +short                   # Just the IP
dig example.com ANY                      # All records
dig +trace example.com                   # Full resolution trace
dig @8.8.8.8 example.com                # Query specific server
dig -x 93.184.216.34                     # Reverse lookup
# Active connections and listening ports
ss -tulnp                                # Linux (modern)
netstat -tulnp                           # Linux (legacy)
netstat -an | grep LISTEN                # Mac
netstat -an                              # Windows

# Test if a remote port is open
nc -zv google.com 443                    # Linux/Mac
Test-NetConnection google.com -Port 443  # Windows PowerShell

# Which process is using a port?
sudo lsof -i :80                         # Mac/Linux
sudo ss -tulnp | grep :80               # Linux
# Your interfaces and IPs
ip addr show                             # Linux (modern)
ifconfig                                 # Mac / older Linux
ipconfig                                 # Windows
ipconfig /all                            # Windows: detailed

# Your public IP
curl -s ifconfig.me                      # Linux/Mac
curl -s icanhazip.com                    # Alternative

# Routing table
ip route show                            # Linux
netstat -rn                              # Mac
route print                              # Windows
# Full conversation (request + response)
curl -v https://example.com

# Headers only
curl -I https://example.com

# Follow redirects
curl -L -I http://google.com

# Download a file
curl -O https://example.com/file.zip

# POST with JSON
curl -X POST https://httpbin.org/post \
  -H "Content-Type: application/json" \
  -d '{"key": "value"}'

# Performance timing
curl -w "DNS:%{time_namelookup} TCP:%{time_connect} TLS:%{time_appconnect} Total:%{time_total}\n" \
  -o /dev/null -s https://example.com
# Capture all traffic on an interface
sudo tcpdump -i eth0

# Capture only specific traffic
sudo tcpdump -i any port 80                    # HTTP
sudo tcpdump -i any port 53                    # DNS
sudo tcpdump -i any host 192.168.1.10          # Specific host
sudo tcpdump -i any 'tcp[tcpflags] & tcp-syn != 0'  # SYN packets

# Save to file for Wireshark
sudo tcpdump -i any -w capture.pcap

# ARP traffic
sudo tcpdump -i any arp
# ARP cache
arp -a                                   # All platforms
ip neigh show                            # Linux (modern)
Wireshark is a free, open-source packet analyzer that captures and displays all traffic on your network interface. It's the difference between reading about networking and watching it happen.
Download from wireshark.org
Select your active network interface (Wi-Fi or Ethernet)
Click Start Capture
Open a website in your browser
Go back to Wireshark and watch packets appear in real-time
# By protocol
http
dns
tls
arp
icmp
tcp
udp

# By address
ip.addr == 192.168.1.10                    # Traffic to/from this IP
ip.src == 192.168.1.10                     # Traffic from this IP
ip.dst == 142.250.190.78                   # Traffic to this IP
eth.addr == a4:83:e7:2f:10:b5             # By MAC address

# By port
tcp.port == 443
tcp.port == 80
udp.port == 53

# TCP flags
tcp.flags.syn == 1 && tcp.flags.ack == 0   # SYN only (connection starts)
tcp.flags.fin == 1                          # FIN (connection closes)
tcp.flags.reset == 1                        # RST (connection aborts)

# HTTP specifics
http.request.method == "GET"
http.response.code == 404

# TLS handshake
tls.handshake

# Combine filters
ip.addr == 192.168.1.10 && tcp.port == 80
dns && ip.src == 192.168.1.10
Start a capture in Wireshark
Open your browser and visit http://example.com (HTTP, not HTTPS — so you can see the content)
Stop the capture
Apply filter: ip.addr == 93.184.216.34 (example.com's IP)
You should see:
ARP — Your machine resolving your gateway's MAC address
DNS — The query for example.com and the response
TCP SYN → SYN-ACK → ACK — The three-way handshake
HTTP GET — Your browser's request
HTTP 200 OK — The server's response with the HTML
TCP FIN → ACK → FIN → ACK — The connection teardown
Click on any packet and look at the bottom pane — you'll see the exact encapsulation layers: Ethernet (Layer 2) → IP (Layer 3) → TCP (Layer 4) → HTTP (Layer 7). This is the encapsulation from section 8, visible and real.
Let's put everything together into a systematic method.
Start from Layer 1 and work your way up. Don't jump to "maybe the DNS is broken" before confirming the cable is plugged in.
# Layer 1: Is the physical connection up?
ip link show
# Look for: state UP

# Layer 2: Do I have a valid IP? (If not, DHCP failed)
ip addr show
# If you see 169.254.x.x → DHCP problem
# If you see no IP at all → interface is down

# Layer 3: Can I reach my gateway?
ip route show default                    # Find gateway IP
ping -c 3 192.168.1.1                   # Ping it

# Layer 3: Can I reach the internet by IP (bypassing DNS)?
ping -c 3 8.8.8.8

# DNS: Can I resolve names?
nslookup google.com
dig google.com

# Application: Can I reach a website?
curl -I https://google.com
Interpretation:
Gateway ping fails → Local network issue (cable, Wi-Fi, router)
8.8.8.8 fails but gateway works → Router/ISP issue
DNS fails but 8.8.8.8 works → DNS problem (change to 8.8.8.8 or 1.1.1.1)
curl fails but DNS works → Firewall, proxy, or application-level issue
# Where is the time being spent?
curl -w "\n  DNS Lookup:   %{time_namelookup}s\n  TCP Connect:  %{time_connect}s\n  TLS Handshake: %{time_appconnect}s\n  First Byte:   %{time_starttransfer}s\n  Total Time:   %{time_total}s\n" -o /dev/null -s https://slow-website.com
Interpretation:
time_namelookup is high → Slow DNS. Try a faster resolver.
time_connect is high → Network latency or congested path. Use mtr to find where.
time_appconnect is high → Slow TLS handshake. Server might be overloaded.
time_starttransfer is high → Server is slow to process your request. Not a network problem.
Host is reachable (Layer 3) but the service isn't responding (Layer 4/7):
# Is the port open?
nc -zv hostname 80
nc -zv hostname 443

# Is the service actually running? (on the server)
ss -tulnp | grep :80

# Is a firewall blocking?
sudo iptables -L -v -n | grep 80
sudo ufw status
The hardest type of problem. Things work sometimes and not others.
# Extended ping to measure packet loss
ping -c 100 google.com
# Look at "packet loss" in the summary

# Continuous route monitoring
mtr --report-cycles 60 google.com
# Run for 60 cycles and look for packet loss at specific hops

# Check for interface errors
ip -s link show eth0
# Look for: errors, dropped, overruns

# Check DNS consistency
for i in $(seq 1 10); do dig +short example.com; sleep 1; done
# Watch for inconsistent results
The best way to learn networking is hands-on. Here's how to set up a lab.
Use VirtualBox or KVM to create virtual machines:
Install VirtualBox (free) or use KVM/QEMU on Linux
Create 2-3 Ubuntu Server VMs
Configure network types:
NAT — VM accesses internet through host
Internal Network — VMs only talk to each other (perfect for isolated experiments)
Bridged — VM gets its own IP on your home network
Practice: SSH between VMs, set up a web server, configure iptables, run Wireshark
Pi-hole — Network-wide ad blocker that teaches DNS
Nginx web server — Learn HTTP, TLS, and reverse proxying
WireGuard VPN — Access your home network remotely
Prometheus + Grafana — Network monitoring and visualization
# Create an isolated network
docker network create --subnet=172.20.0.0/16 mylab

# Run containers on it
docker run -d --name web --network mylab --ip 172.20.0.10 nginx
docker run -d --name client --network mylab alpine sleep 3600

# Test connectivity between containers
docker exec client ping web
docker exec client wget -qO- http://web

# Inspect the network
docker network inspect mylab
Set up SSH between two machines with key-based authentication
Run a web server (nginx) and access it from another device
Deploy Pi-hole and analyze the DNS queries your devices make
Write iptables rules that only allow SSH and HTTP to your server
Capture a full HTTP transaction with tcpdump and analyze it in Wireshark
Configure nginx as a reverse proxy with HTTPS (Let's Encrypt)
Set up WireGuard VPN and connect to your home network remotely
Build a two-subnet network in VirtualBox with a router VM connecting them
Set up a local DNS server with bind9 or dnsmasq and use it for your network
Deploy a monitoring stack (Prometheus + Grafana + node_exporter) and build dashboards
| Term | Definition |
|---|---|
| ARP | Address Resolution Protocol — maps IP addresses to MAC addresses on a local network |
| Bandwidth | Maximum theoretical data transfer rate of a connection |
| BGP | Border Gateway Protocol — routes traffic between autonomous systems on the internet |
| Broadcast | Sending data to all devices on a network segment |
| CIDR | Classless Inter-Domain Routing — notation for expressing IP ranges (e.g., /24) |
| DHCP | Dynamic Host Configuration Protocol — automatically assigns IP configuration |
| DNS | Domain Name System — translates domain names to IP addresses |
| Encapsulation | Process of wrapping data with headers at each network layer |
| Firewall | System that filters network traffic based on rules |
| Frame | Layer 2 data unit (includes MAC addresses) |
| Gateway | Router that connects a local network to other networks |
| HTTP | HyperText Transfer Protocol — the protocol of the web |
| ICMP | Internet Control Message Protocol — used for ping, traceroute, and error reporting |
| IP | Internet Protocol — Layer 3 protocol for addressing and routing |
| Latency | Time delay for data to travel from source to destination |
| MAC Address | Media Access Control address — hardware identifier for a network interface |
| Multicast | Sending data to a group of interested devices |
| NAT | Network Address Translation — maps private IPs to public IPs through a router |
| Packet | Layer 3 data unit (includes IP addresses) |
| Port | Number (0–65535) identifying an application or service on a device |
| Protocol | A set of rules governing communication between devices |
| Proxy | Intermediary server between clients and destination servers |
| QUIC | UDP-based transport protocol used by HTTP/3 |
| Router | Device that forwards packets between different networks (Layer 3) |
| Segment | Layer 4 data unit (TCP) |
| Socket | Combination of IP address + port number |
| Subnet | A logical division of a larger network |
| Switch | Device that forwards frames within a local network using MAC addresses (Layer 2) |
| TCP | Transmission Control Protocol — reliable, connection-oriented transport |
| Throughput | Actual data transfer rate achieved in practice |
| TLS | Transport Layer Security — encryption protocol securing HTTPS and other protocols |
| TTL | Time To Live — limits how many hops a packet can make before being discarded |
| UDP | User Datagram Protocol — fast, connectionless transport |
| Unicast | Sending data to one specific device |
| VLAN | Virtual LAN — logically segments a switch into separate broadcast domains |
| VPN | Virtual Private Network — encrypted tunnel over public infrastructure |
| WAF | Web Application Firewall — filters HTTP traffic at the application layer |
Fundamentals: Professor Messer's CompTIA Network+ videos (YouTube), Cloudflare Learning Center, The TCP/IP Guide (online)
Hands-on: TryHackMe (guided labs), Hack The Box (more advanced), OverTheWire Bandit (command-line challenges)
Deep dives: "Computer Networking: A Top-Down Approach" by Kurose & Ross, "TCP/IP Illustrated" by W. Richard Stevens, Beej's Guide to Network Programming
CompTIA Network+ — Standard entry-level networking certification
Cisco CCNA — Vendor-specific but highly respected, deep routing and switching
AWS/Azure/GCP Cloud Networking — Cloud-specific network certifications
Once you've mastered this guide: VLANs, load balancing, SDN (Software-Defined Networking), network automation (Ansible/Terraform), container networking (CNI, service mesh), eBPF for observability, Zero Trust architecture, and IPv6 deployment.
If you've read this far, you now have a genuine foundation in networking — not just the theory, but the practical commands, the mental models, and the troubleshooting methodology. You understand how data travels from your keyboard to a server across the world and back. You know how to systematically debug when things break.
The most important thing now is to practice. Open a terminal and run those commands. Set up a home lab. Break things on purpose and fix them. Capture packets with Wireshark and stare at them until the layers make sense.
Networking is one of those skills that compounds. Every new concept connects to things you already know. Subnetting clicks once you understand binary IP addresses. Firewalls make sense once you understand ports. Troubleshooting becomes systematic once you internalize the layer model.
Every expert was once a beginner who felt overwhelmed by ping. You've got this.
Found this helpful? Share it with someone starting their networking journey. Spot an error? I'd love to hear about it — the best technical content is always a collaboration.